graph TD
    User["You user folder"] --> MoreFolders["... possibly several folder levels..."]
    MoreFolders --> Master["Master's degree folder"]
    Master --> ML["`**ML (Course Root)**`"]
    Master --> OtherMasters["Other master's degree courses stuff"]
    ML --> MIIN["`**MIIN**`"]
    ML --> Other["Other Machine Learning course stuff"]

    style ML fill:#d6b588,stroke:#333,stroke-width:2px
    style MIIN fill:#d6b588,stroke:#333,stroke-width:2px
Machine Learning 2026 – Student Setup Guide.
Official Master’s Degree in Industrial Engineering + Master’s Degree in Smart Industry
Introduction
In this course you will run Python code using a Jupyter notebook server inside a Docker container, and connect to it from Visual Studio Code (VS Code). We will also install some additional tools on your host machine (outside the container) to work with git repositories, support PDF export and Quarto publishing services. This guide walks you through the steps to set up your environment. In case of doubt, ask the instructors before proceeding!
Important Notice
Make sure you read these notes at least once before starting the setup process. We will be going over this setup instructions in the course first session. So the goal of reading this document now is to familiarize yourself with the steps involved. If you are certain that you can proceed on your own (familiarity with Git and Docker is required), you can start the setup right away. But if you have any questions or concerns, please wait until the first session where we will go through the setup together and help you with any issues.
Tip
The copy code icon  that appears when you hover over the code blocks in this guide allows you to easily copy the code to your clipboard for pasting into your terminal or other applications.
0. Prerequisites
0.1. Hardware / OS
- A laptop with at least:
- 8 GB RAM (16 GB recommended); if you have less than 8 GB, let us know.
- 10–20 GB free disk space. If you have less than 20 GB of free disk space, let us know.
- Operating system:
- MacOS (Apple Silicon is assumed; if you have an Intel Mac, let us know)
- Windows 11 (64-bit)
- If you use Linux, let us know.
0.2. Create a course folder
Decide on a folder where you will keep everything related to this course. It can be something for example like:
- On macOS:
/Users/<yourname>/Master/ML - On Windows:
C:\Users\<yourname>\Master\ML
In these examples the Master folder refers to a folder where you keep all your MII-MIINT master’s degree-related files, and the ML folder is specifically for this course. The Master folder may be located deeper in your user folder. In this setup guide we will call this ML folder your course root. You can give the course root any name you want, but don’t change the names of its subfolders that we will be creating below (like MIIN in the diagram below).
1. Install Docker and the Course Docker Image
Open a browser and go to www.docker.com/products/docker-desktop. Click on Download Docker Desktop and select the right download for your OS, as illustrated below:

1.1. Docker Desktop Setup for MacOS
Open the downloaded
.dmgfile. Drag Docker.app into the Applications folder.Start Docker by hitting Command + Spacebar, typing Docker, and pressing Enter.
You may need to accept security dialogs and sign in (create a free Docker account if you don’t already have one).
Wait until the Docker whale icon in the menu bar stops animating and shows “Docker Desktop is running”.
To verify Docker works, open Terminal and run:
docker --versionYou should see a reply like
Docker version 27.5.1, build 9f9e405
1.2. Docker Desktop Setup for Windows
Important: On Windows, Docker Desktop requires WSL2 and virtualization enabled.
1.2.1. Enable WSL2 and Virtualization (one-time)
Press Start, type
powershell, right-click Windows PowerShell, choose Run as administrator.In the terminal that opens run:
wsl --installReboot when prompted. After the reboot verify WSL is installed by opening a Powershell terminal again and running:
wsl -l -v
You should see at least one distro (e.g. Ubuntu).
Also make sure virtualization is enabled in your BIOS/UEFI (usually it already is; if not, look for “Intel VT-x” or “AMD-V”).
1.2.2. Install Docker Desktop
- Go to:
https://www.docker.com/products/docker-desktop/ - Download Docker Desktop for Windows.
- Run the installer:
- During setup, leave “Use WSL 2 backend” checked.
- After installation, start Docker Desktop from the Start menu.
- Wait for it to say “Docker Desktop is running”.
Verify Docker works. In PowerShell:
docker --versionYou should see a reply like
Docker version 27.5.1, build 9f9e4051.3. Get and Run the Course Docker Image
Choose the right folder to run the container from
You should always run the container from the MIIN clone folder. This ensures that Docker can see all the subfolders we will need to access. The dockerfile and the run command are designed to mount the MIIN folder into a (virtual) folder inside the container called /wd (work directory).
Additionally, this keeps the container isolated from other folders on your computer, which is a good security practice.
1.3.1. Get the course Docker image from Docker Hub
In Terminal for MacOS o or PowerShell for Windows run the following command to download the pre-built Docker image for the course from Docker Hub:
docker pull mlmiin/mlmiin:2026V01and wait until the download ends. This is a several gigabytes download, so it may take a while depending on your internet connection speed.
2. Install Visual Studio Code and Extensions
2.1. Install VS Code
- Go to: https://code.visualstudio.com/
- Download and install VS Code for your OS (macOS or Windows).
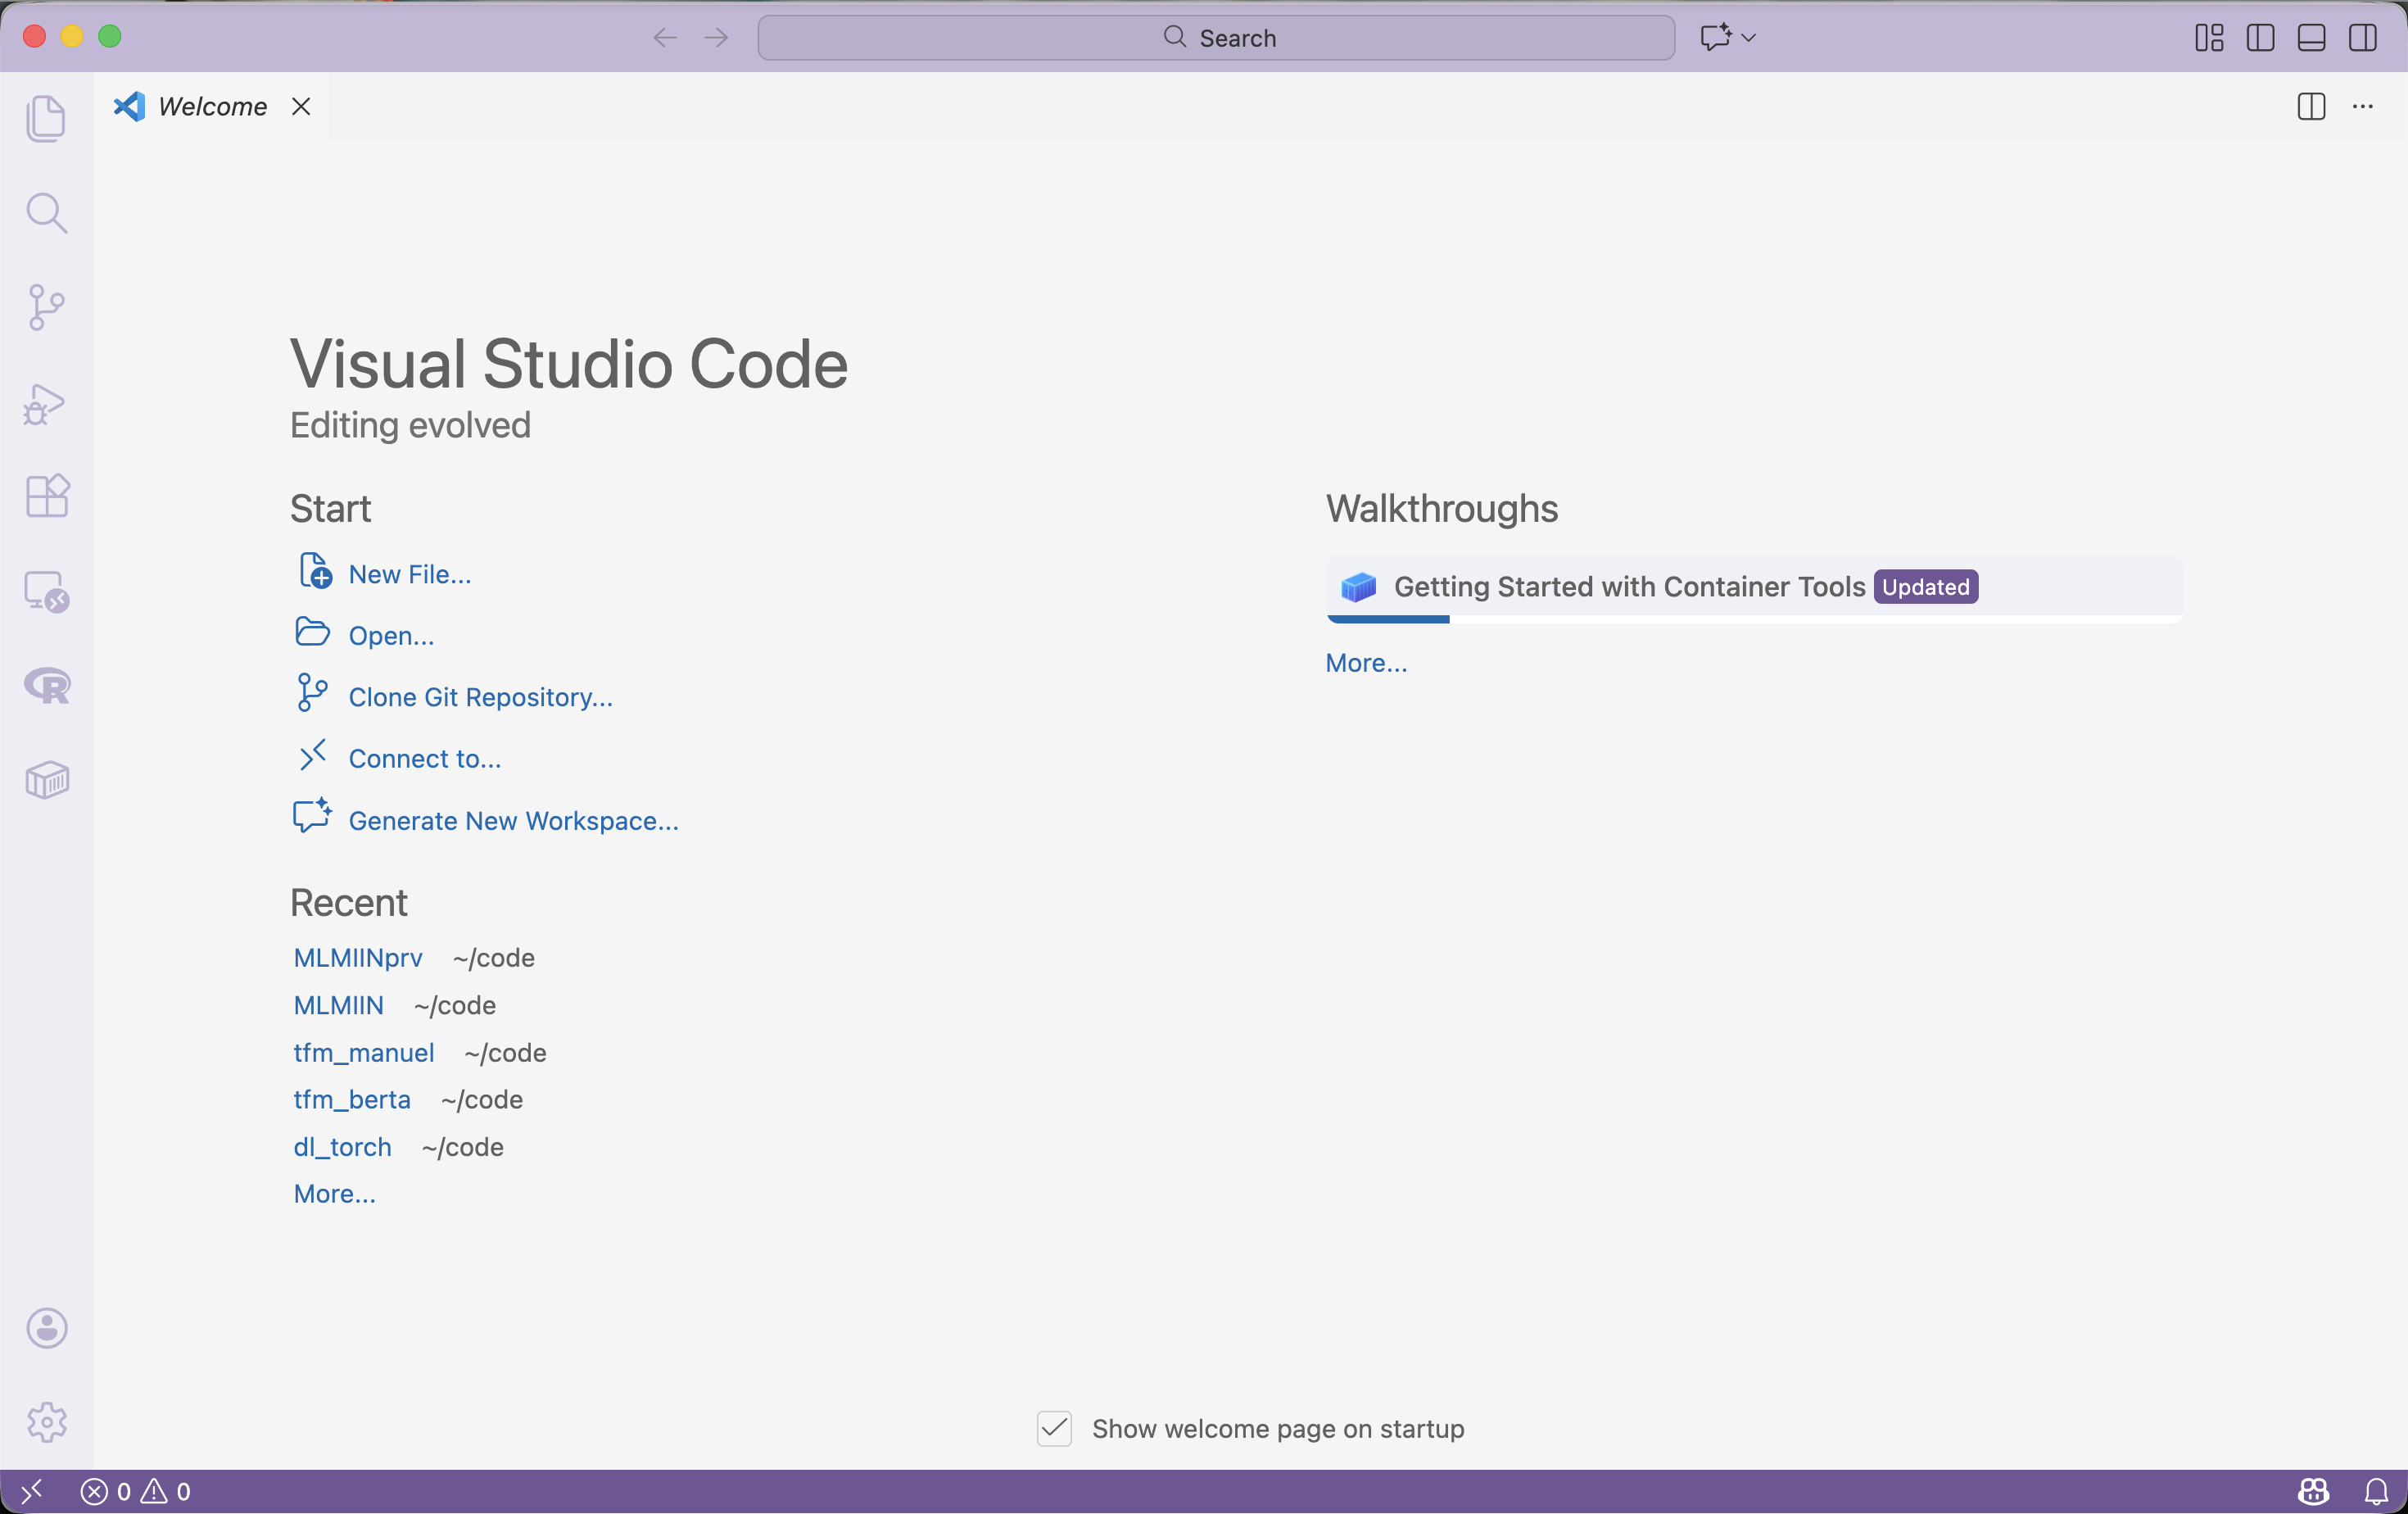
- Start VS Code.
You should see something like this:
2.2. Install required extensions
Install the following extensions from the VS Code Marketplace. With VS Code open, you may simply open each link below to open the extension page, then click Install.
Make sure the extensions are enabled (no “Enable” button visible).
3. Install git and GitHub Desktop.
If you already have git installed, you can skip this step. If you are unsure, open a terminal (macOS) or PowerShell (Windows) and run:
git --versionIf you see a version number (e.g. git version 2.34.1), you have git installed. If you see an error, follow the instructions below.
Besides, if you have not used Git and GitHub before, you may consider installing GitHub Desktop (see below for instructions). It provides a graphical interface to manage git repositories and is easier to use for beginners. Alternatively, many people prefer using the VS Code Git integration, that we will also describe below. These tools are compatible, so you can use both if you wish. If you prefer to use git from the command line, we assume that you will handle authentication with GitHub using SSH keys or personal access tokens as needed.
3.1 Install git on MacOS
3.1.1. Install Homebrew (if not already installed)
If you are a Mac user, Homebrew is a popular package manager that makes it easy to install software like git and many other useful tools. The homepage is https://brew.sh.
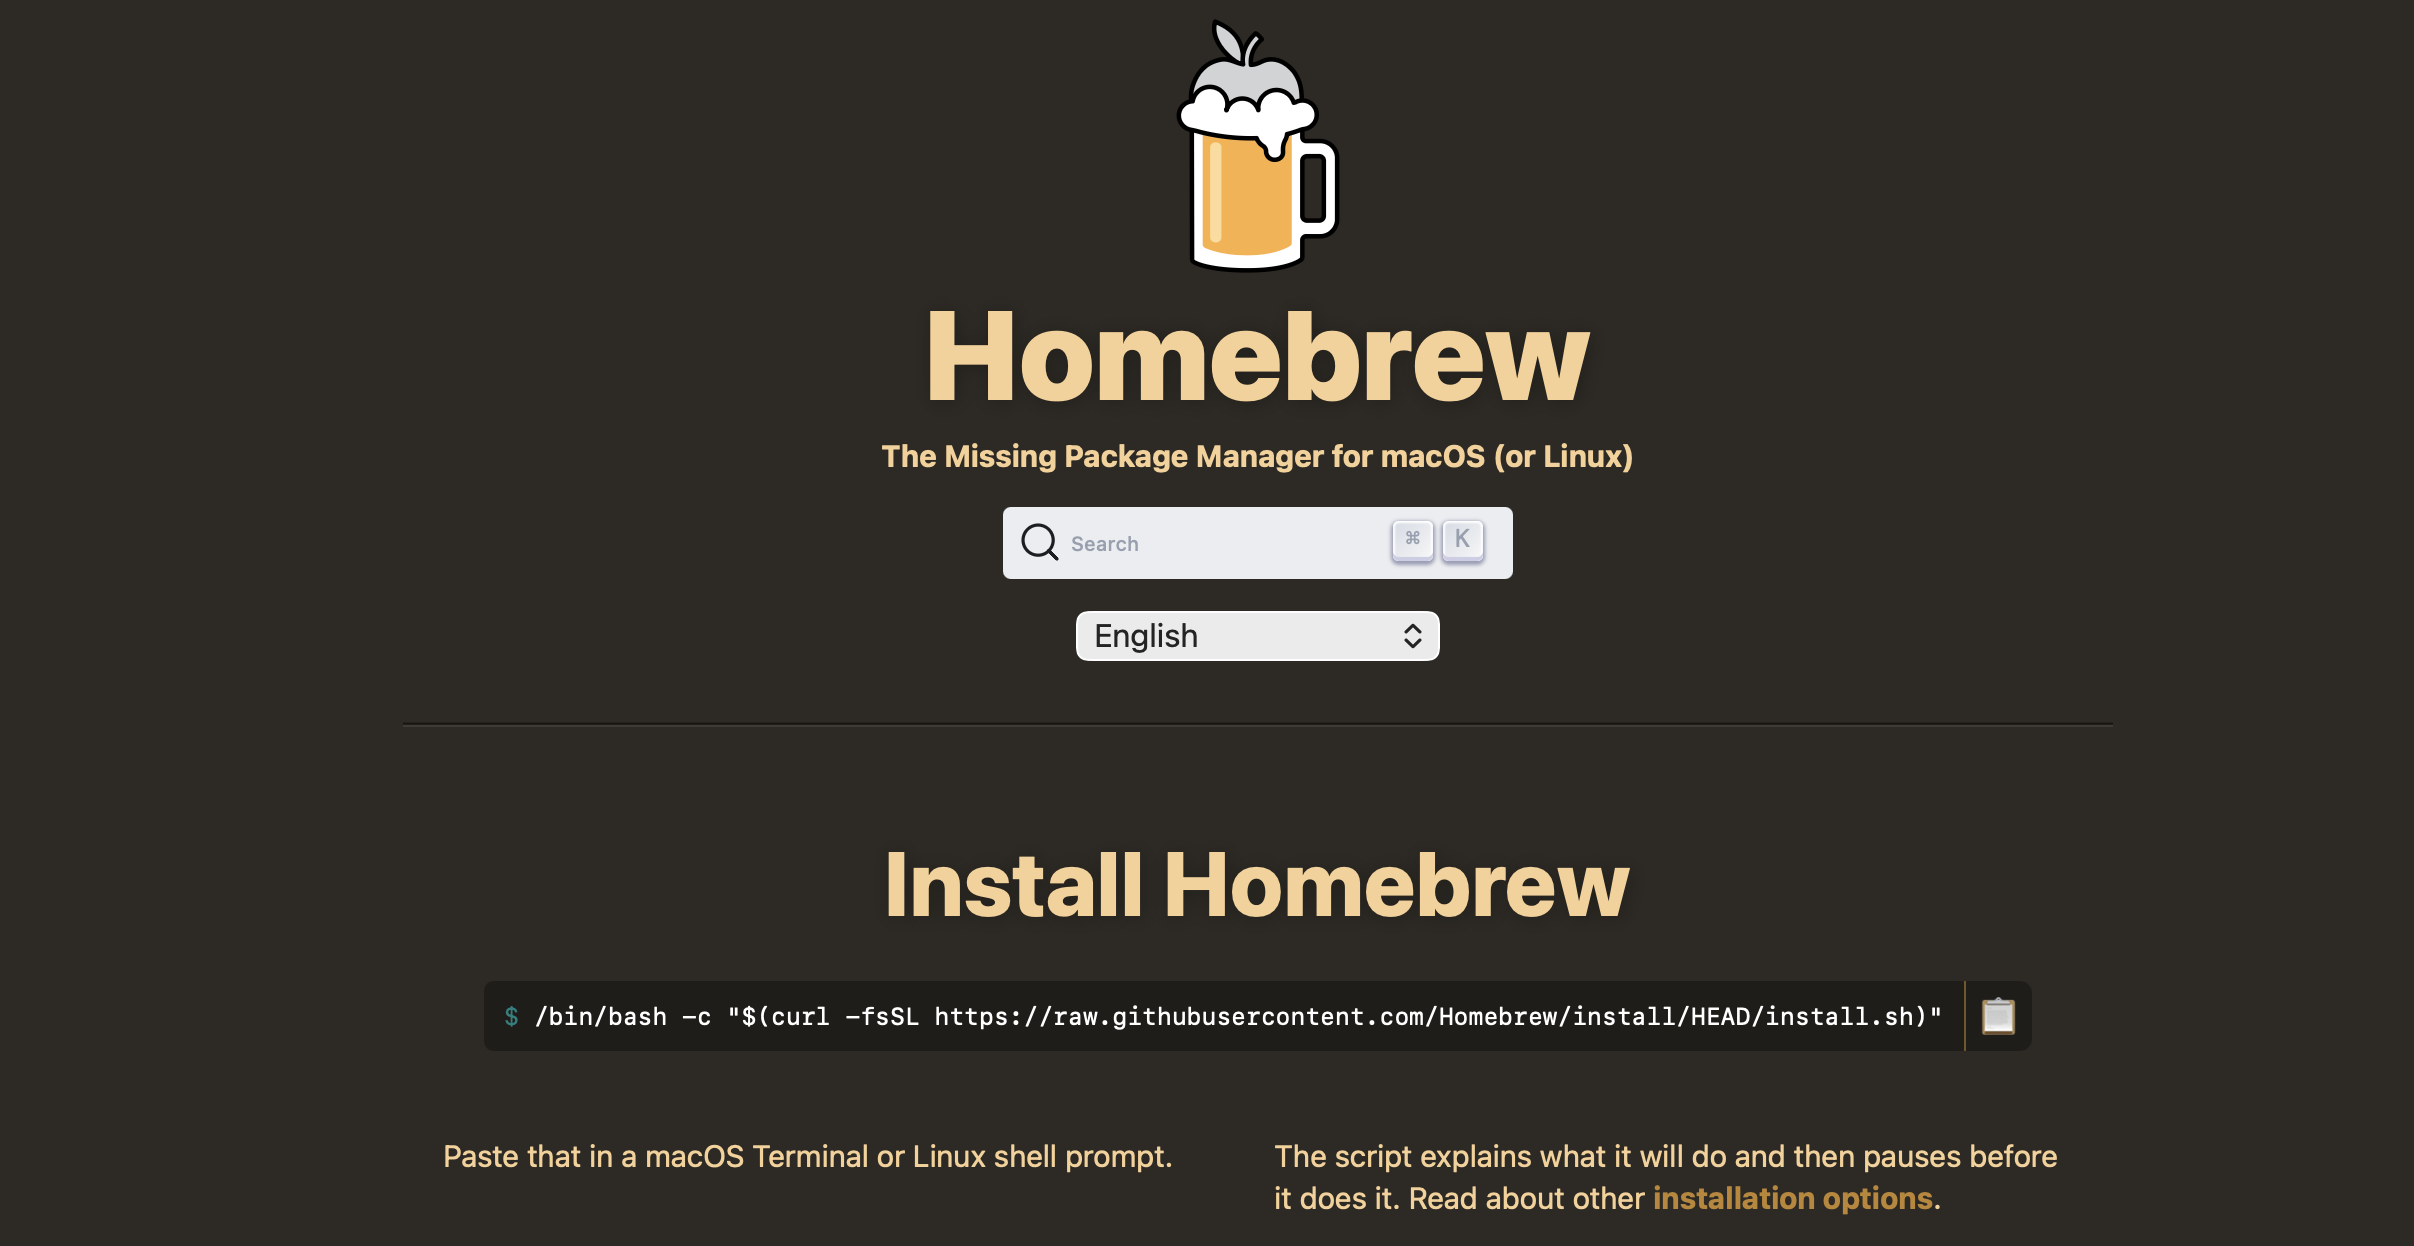
As shown in the picture above you can install it by opening Terminal and running the following command:
/bin/bash -c "$(curl -fsSL https://raw.githubusercontent.com/Homebrew/install/HEAD/install.sh)"When the Homebrew setup ends check it by running:
brew --version3.1.2. Install git using Homebrew
Now you can install git by running:
brew install gitThat’s it! You can verify the installation by running:
git --version3.2 Install git on Windows
To install git on Windows go to https://git-scm.com/install/windows and download the installer (Git for Windows/x64 Setup).
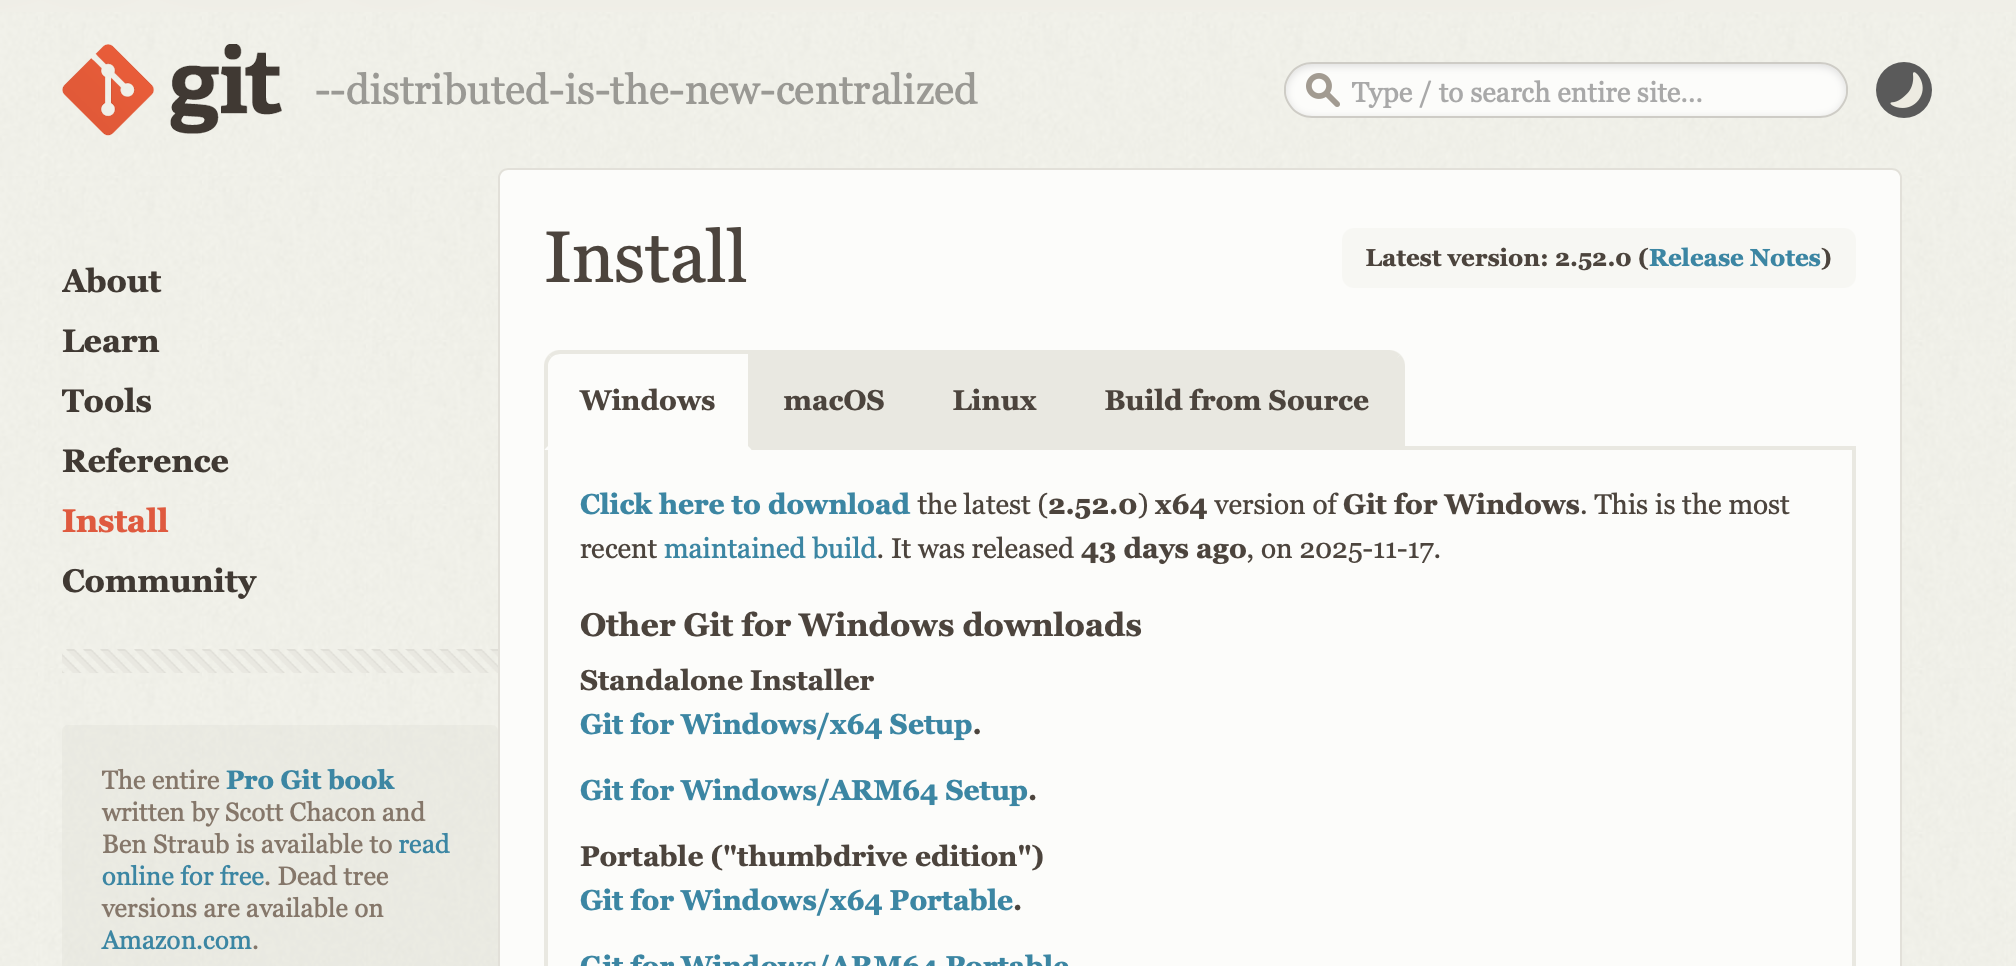
Run the installer and follow the instructions. You can leave all options at their default values.
After installation, open PowerShell and verify the installation by running:
git --version3.3 Create a GitHub account
- If you haven’t already, we require that you create a free GitHub account, linked to your university email. You can do this by going to https://github.com/signup and following the instructions. You do not need to provide payment information for the free account!
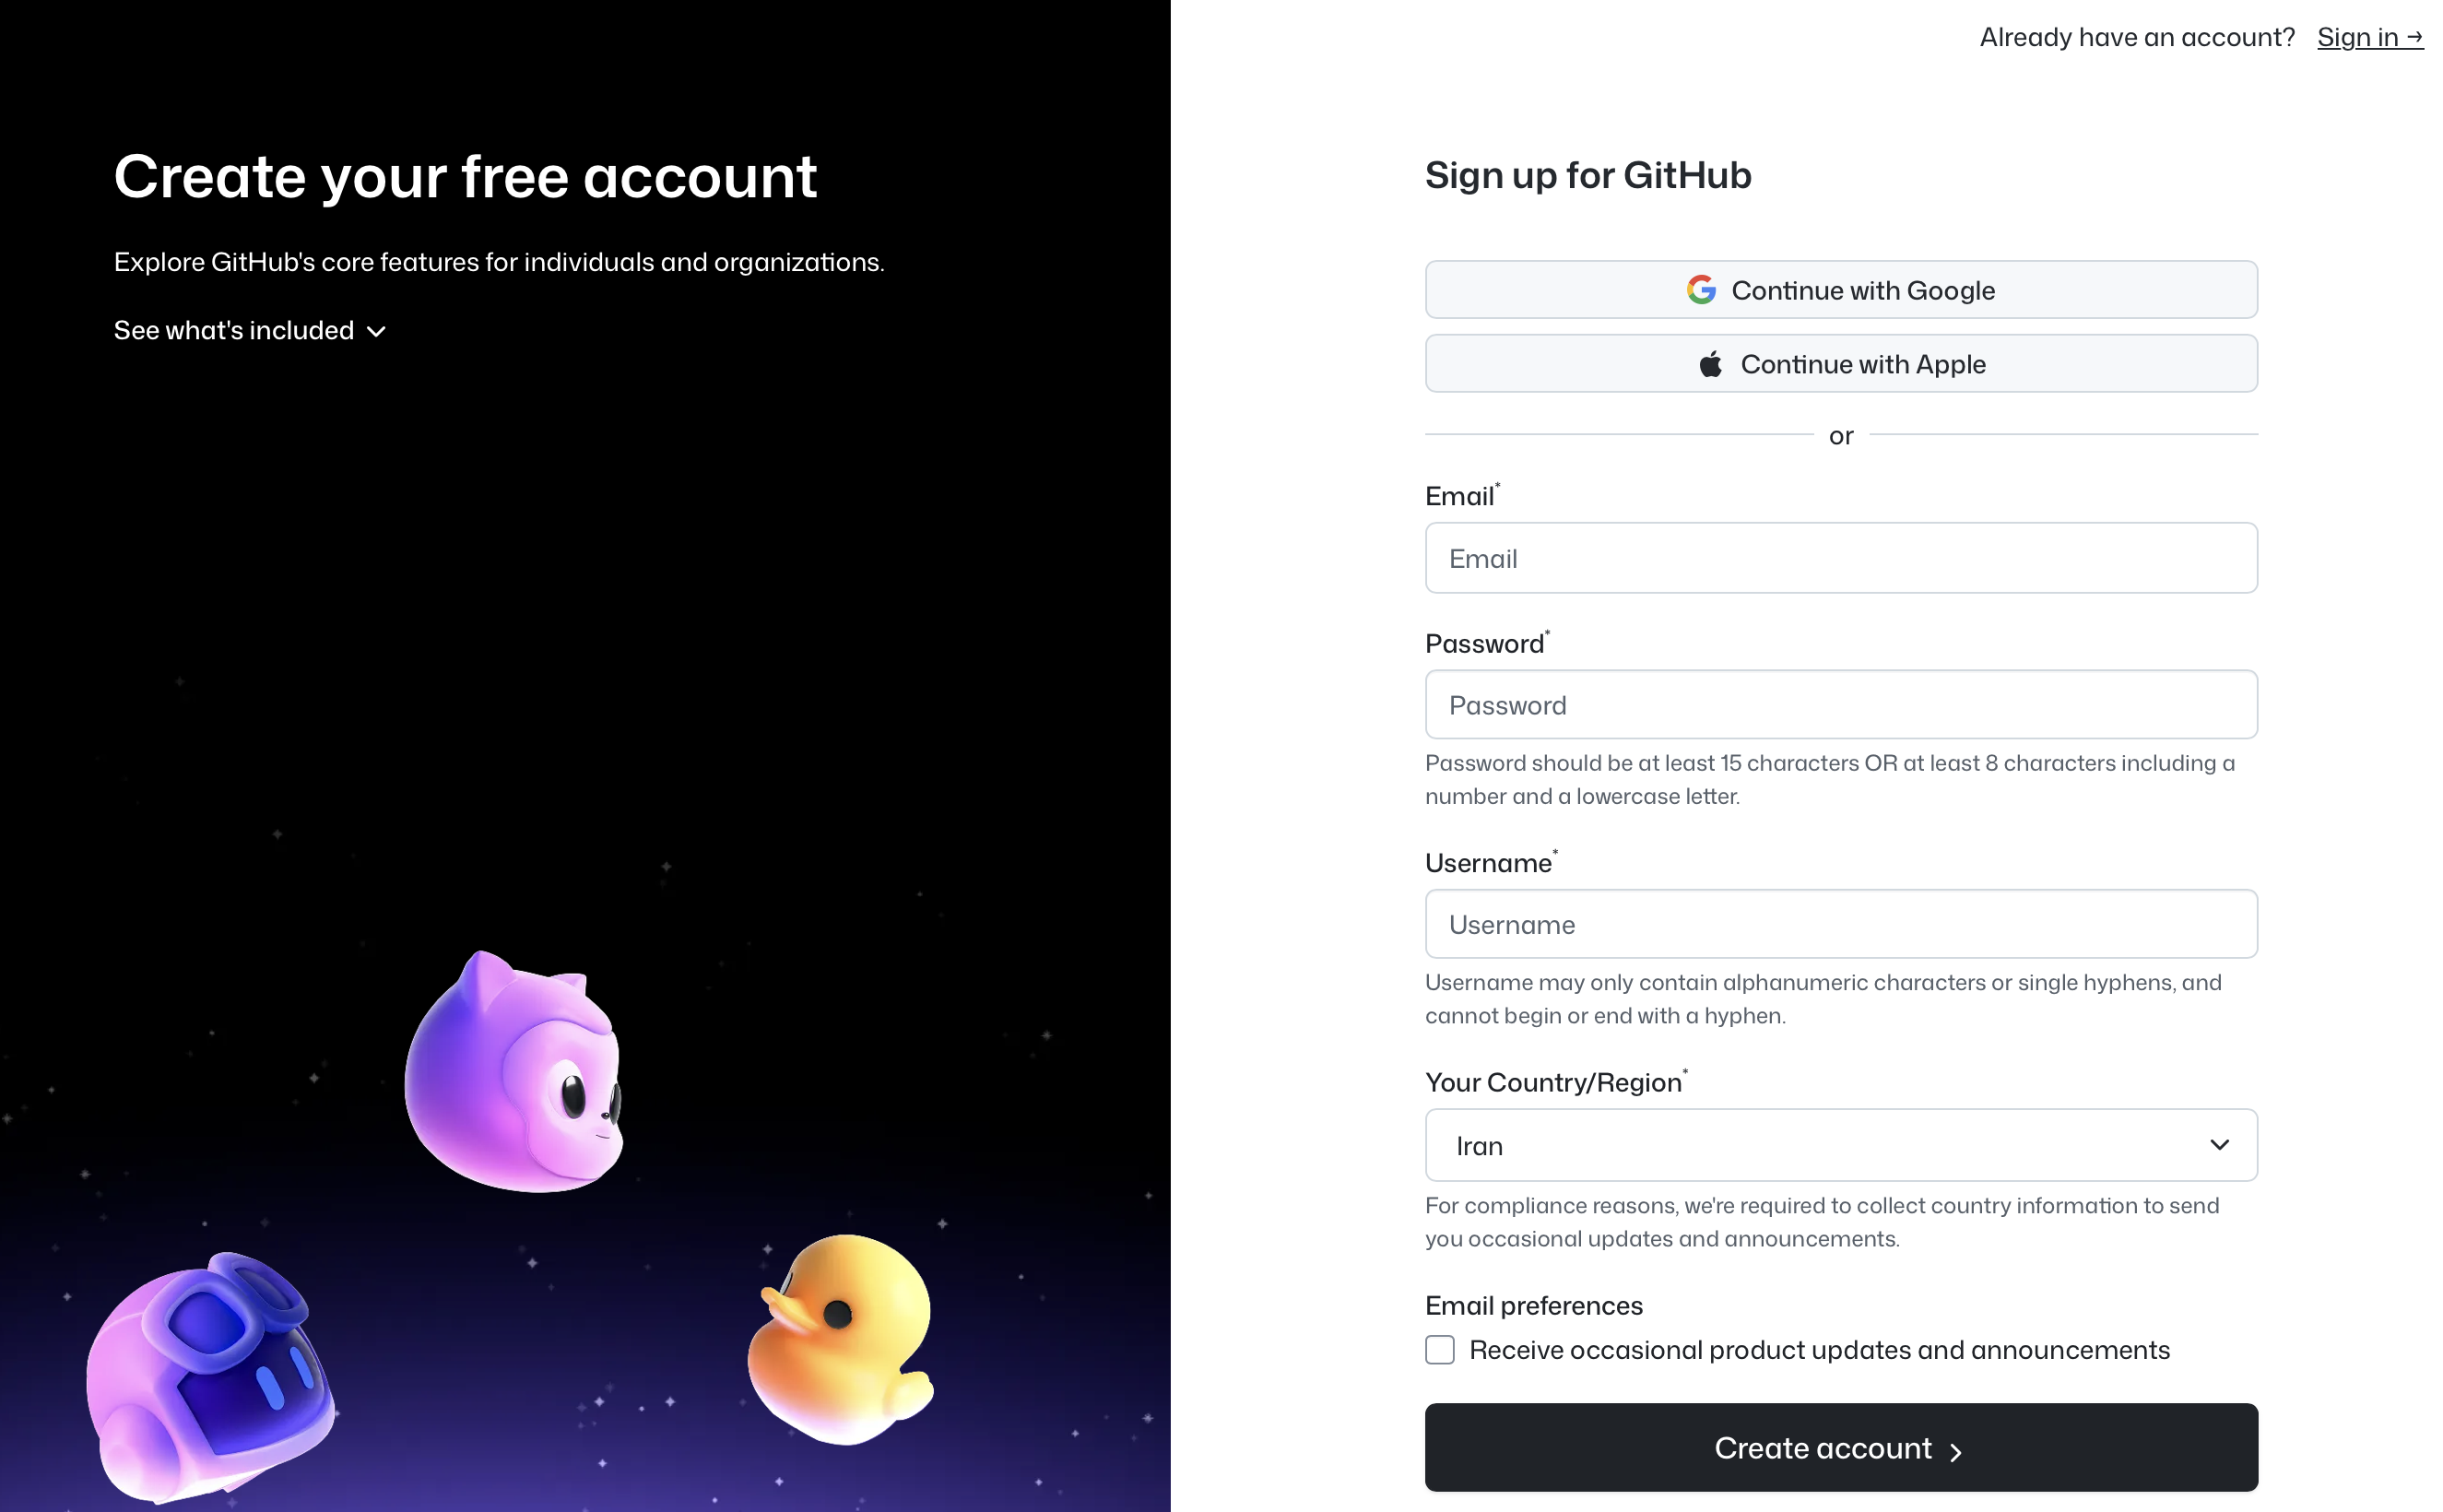
Send your GitHub username to your instructor ASAP once you have created the account.
Optional but strongly recommended: after creating your GitHub account, apply for a student developer pack at https://education.github.com/pack. It gives you access to many free tools and services for students, including among others Copilot, GitHub Codespaces, and more.
3.4. Install GitHub Desktop (optional)
If you prefer a graphical interface to manage git repositories, you can install GitHub Desktop. Go to https://desktop.github.com/download/ and download the version for your OS. Run the installer and follow the instructions.
3.4.1 Configure GitHub Desktop
After installing GitHub Desktop, open it and sign in with your GitHub account (use Settings). You can then clone repositories, create new ones, and manage your git projects using the graphical interface.
Choose the right GitHub account for all git related operations
Login to your GitHub account and make sure that this is the GtHub account linked to your university email, as requested above. If you have multiple GitHub accounts, make sure you are using the correct one (in taht case you will need to check this for every course session or assignment).
3.4.2 For Windows users: Configure GitHub Desktop to use powershell as terminal.
Open GitHub Desktop and go to the File menu, then select Options. Navigate to integrations, locate the Shell section and click the dropdown menu. Select PowerShell from the list of available applications and hit Save.
3.5. Using git in VS Code
VS Code has built-in support for git that is very convenient if you already have some experience with git. You can access it by clicking on the Source Control icon in the left sidebar (it looks like a branch with a dot). From there, you can clone repositories, commit changes, push to remote repositories, and more.
The first time you use git in VS Code, it may ask you to login to your GitHub account. Follow the instructions to authenticate.
4. Install LaTeX for PDF Export
4.1. MacOS
We will use LaTeX to export notebooks to PDF. You need to install it on your host machine (outside the Docker container).
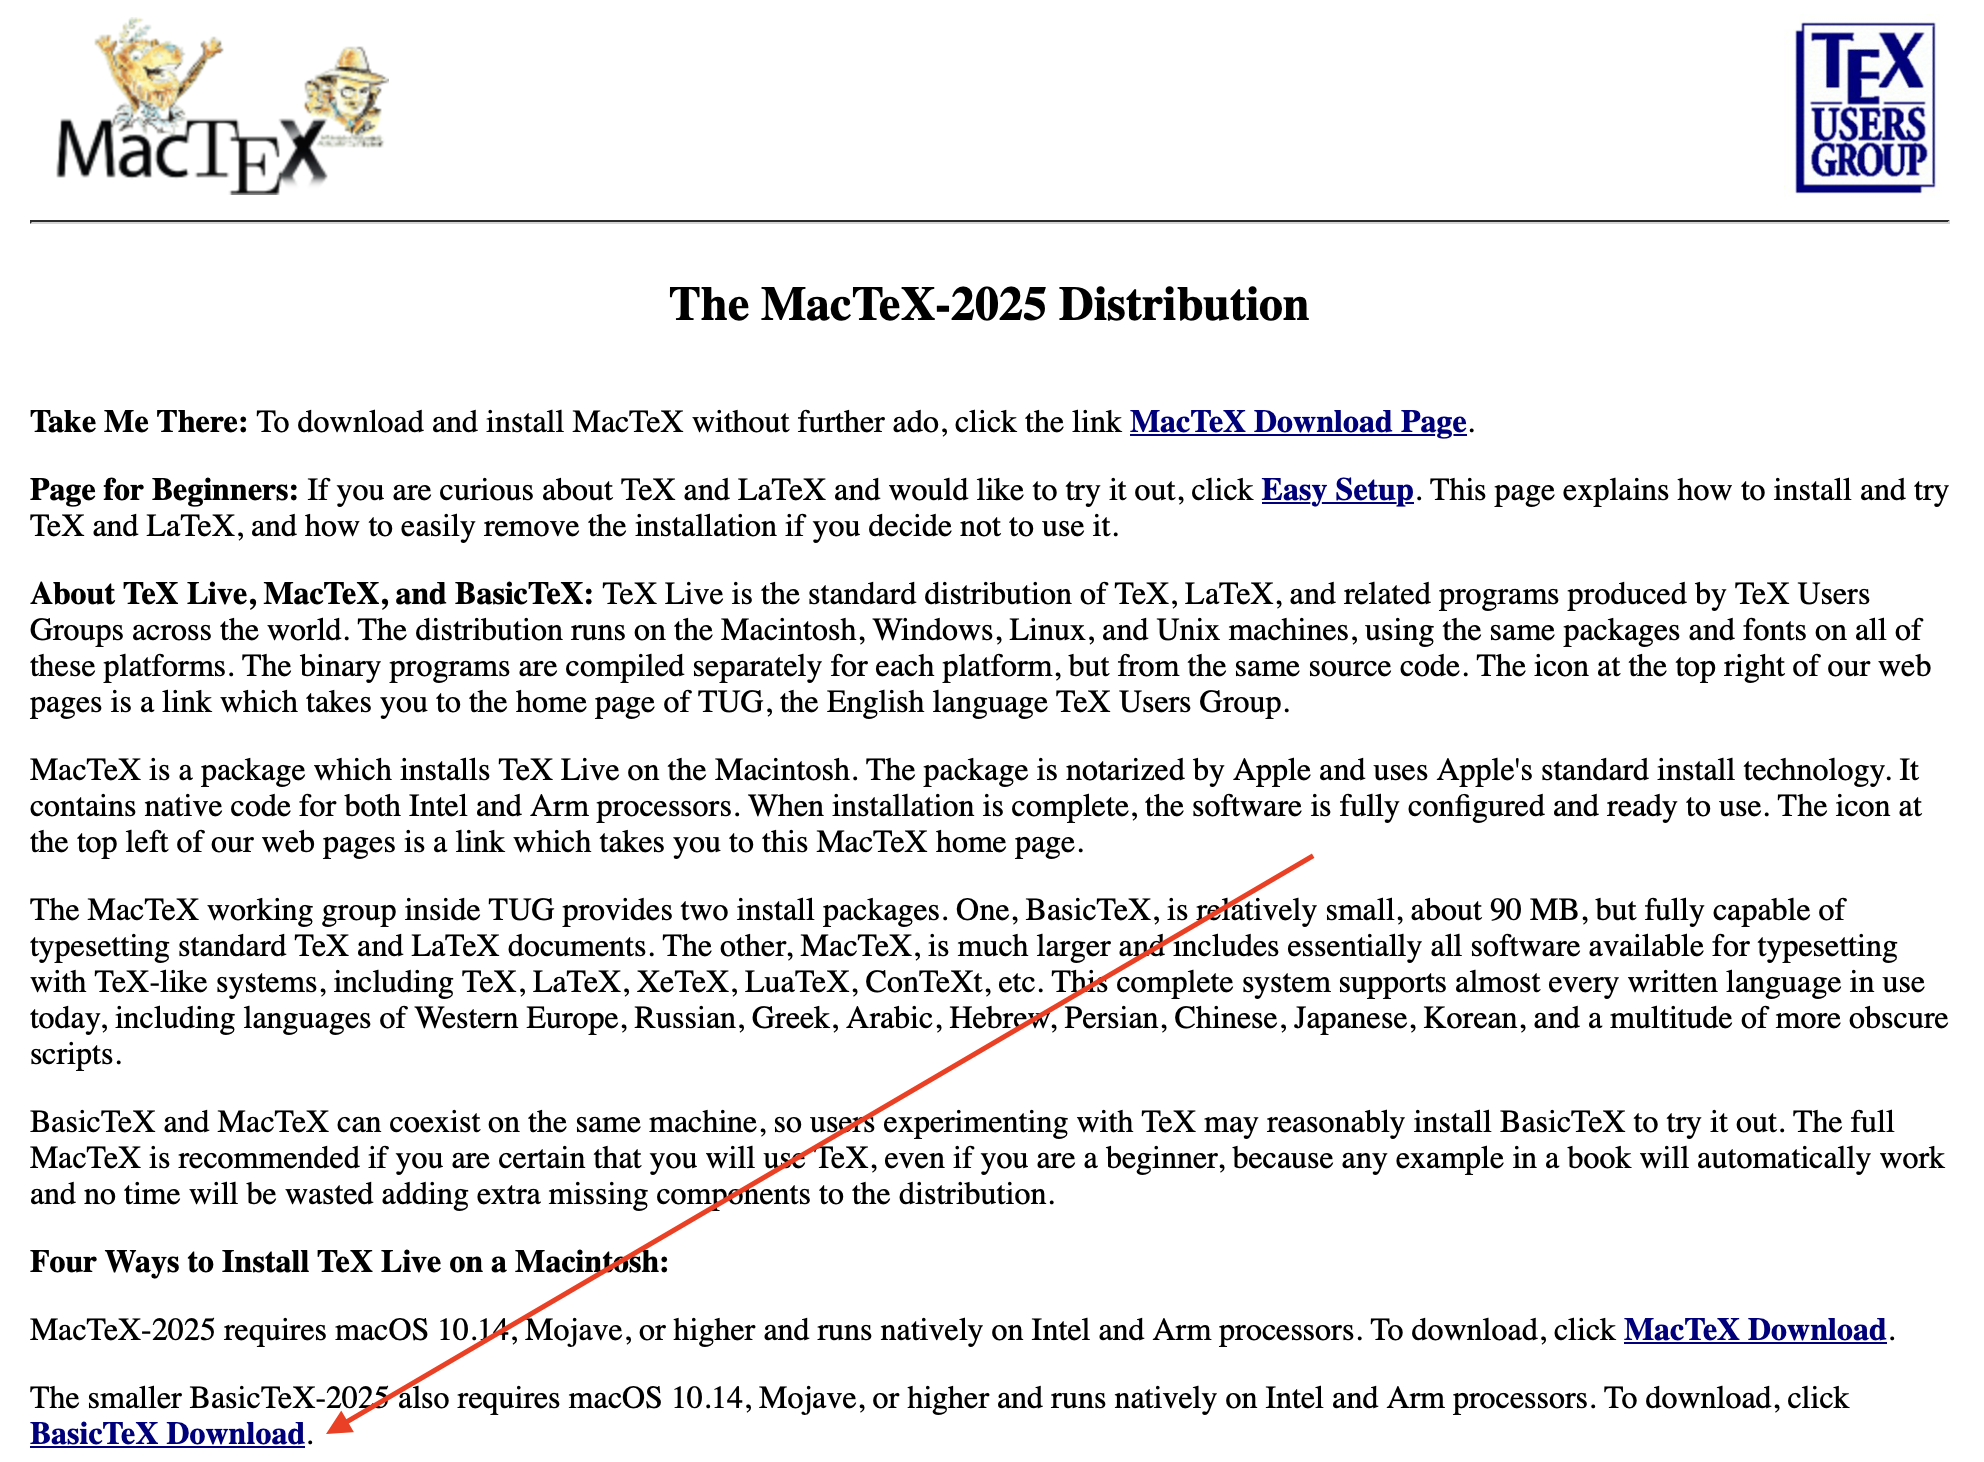
Install LaTeX from https://www.tug.org/mactex/. We recommend installing BasicTeX (smaller download) unless you plan to use LaTeX heavily outside this course. See the figure of the MacTex website below for reference
<
If you are comfortable with the command line, you can also install it using Homebrew:
brew install --cask basictex4.2. Windows
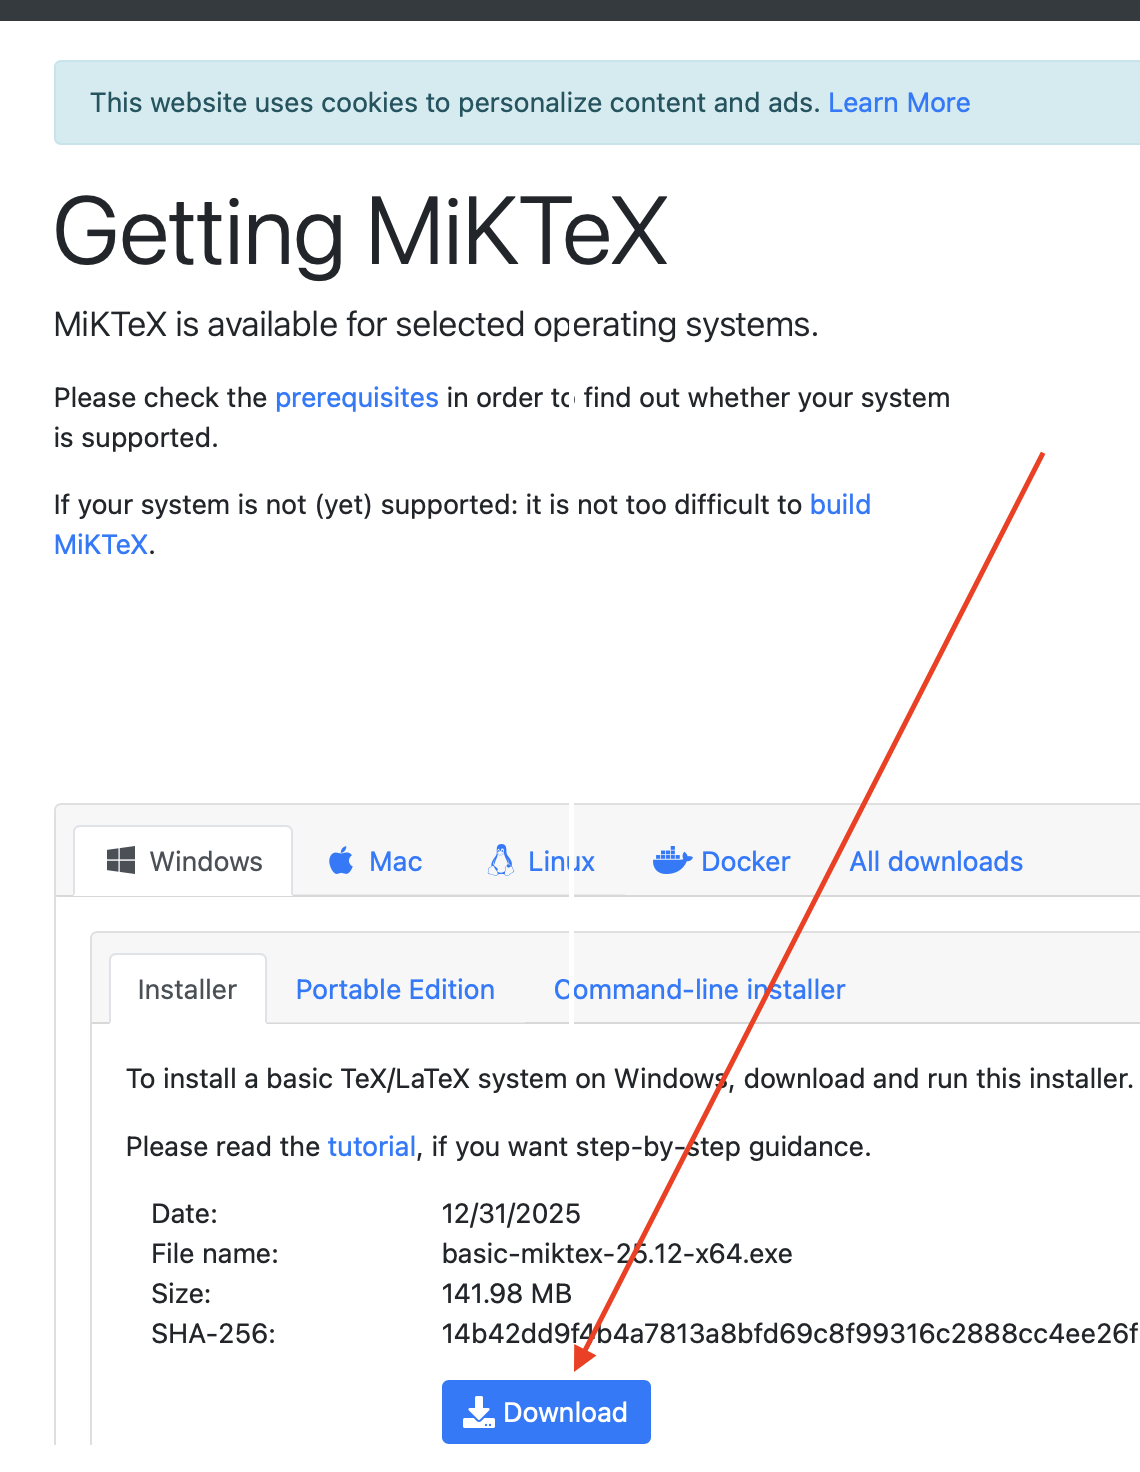
Install MiKTeX from https://miktex.org/download. See the figure of the MikTex website below for reference
<
5. Install Quarto & Quarto Extension for VS Code
5.1. About Quarto and setup
Quarto is a scientific and technical publishing system built on Pandoc. It is used to create documents, presentations, websites, and more, using plain text files with simple formatting syntax. This guide you are reading is in fact a quarto document (rendered as html). And it offers an (arguably superior) alternative to Jupyter notebooks for creating documents that combine code, text, and visualizations:
- Being plain-text based, it works well with git version control systems (opposite to Jupyter notebooks, which are JSON files that do not work well with git, to say the least).
- Quarto documents can be very easily converted to multiple output formats (HTML, PDF, Word, etc.) from the same source file. Jupyter notebooks are more limited in this regard.
- Quarto documents can combine different programming languages (Python, R, Julia, C++, etc.) in the same document, while Jupyter notebooks are limited to a single kernel/language per notebook.
Despite this praise of Quarto documents, we acknowledge that Jupyter notebooks are very popular in the data science and machine learning community, and they have become the current de facto standard for interactive coding. Therefore, we will focus on Jupyter notebooks in this course. However, if you are interested in learning about Quarto, let us know, and we can provide additional resources and guidance.
You can install Quarto from https://quarto.org/docs/get-started/.
5.2. Quarto extension for VS Code
We will also use Quarto to improve the display of the notebooks for the course. In order to do that you should install the Quarto extension for VS Code, using the link below:
The setup for this extension is similar to those described in section 2.2 above.
5.3. Using Quarto to render notebooks
Once you have installed Quarto and the Quarto extension for VS Code, you can use it to render Jupyter notebooks to various formats (HTML, PDF, etc.). To do this, open a Jupyter notebook in VS Code (we will cover this below), then click on the Quarto Render button in the top-right corner of the notebook editor panel. Select the desired output format and follow the prompts to render the notebook.
Alternatively, you can render notebooks from the command line using Quarto. Open a terminal in VS Code, (click on Terminal → New Terminal) navigate to the folder containing the notebook, and run:
quarto render your_notebook.ipynb --to htmlChange html to pdf or other formats as desired. The rendered file will be saved in the same folder as the original notebook. If you run into any issues, please let your instructor know.
6. Get Session Files
6.1 Clone the course repository
This step depends on the tool you are using: GitHub Desktop, VS Code, or git command line. In either case you will need the course repository URL which is:
https://github.com/ML-MIC/MLMIINChoose the instructions that match your preferred git management tool below.
6.1.1 Using GitHub Desktop
Open GitHub Desktop and go to File → Clone Repository…. See the figure for the window that opens:

Make sure URL tab is selected. Paste the course repository URL above in the Repository URL field. Also make sure that the Local Path field points to your course root folder (the repository MIIN will be cloned as a subfolder of your course root folder, see the diagram in section 0.2 above). Finally click on Clone and wait until the cloning is completed. You can now open the folder in VS Code (and answer Yes about trusting the authors).
6.1.2 Using VS Code
Open VS Code. Press Ctrl+Shift+P (Windows) or Cmd+Shift+P (macOS) to open the command palette. Type Git: Clone and select it.
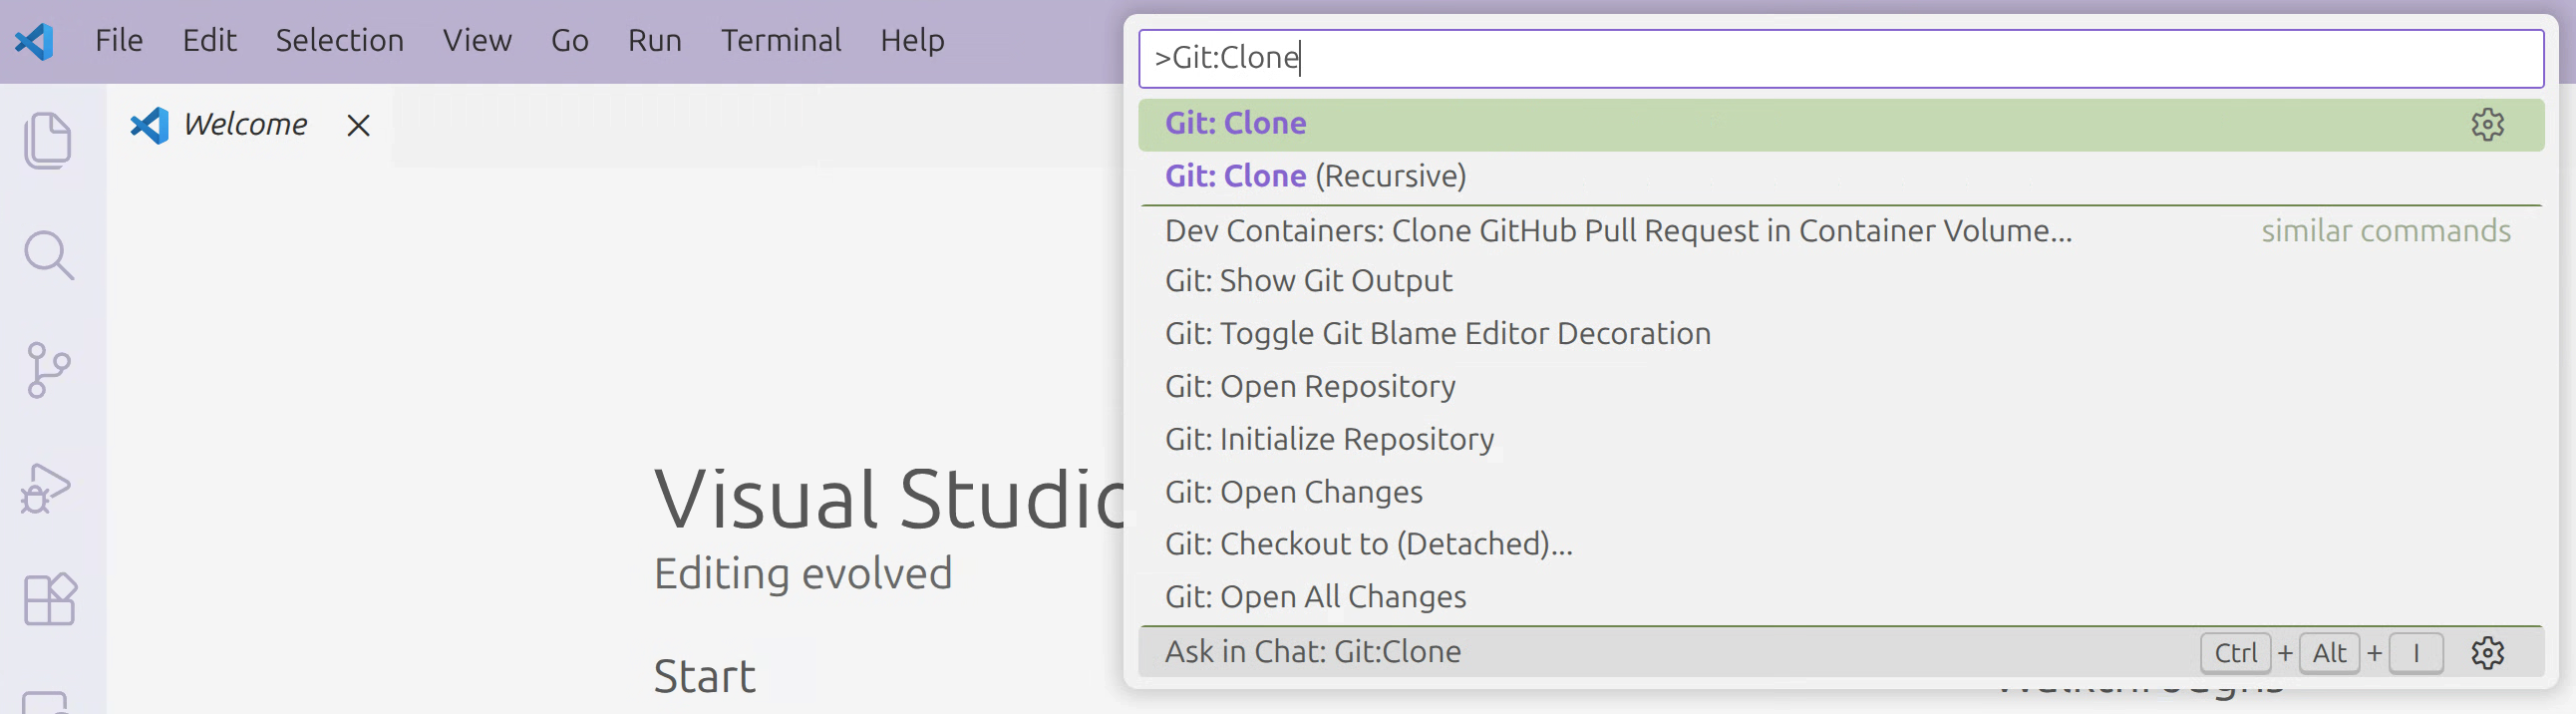
Next, paste the URL of the course repo and press Enter.

When prompted, choose your course root folder (the one we called ML) as the local repository destination (the repository MIIN will be cloned as a subfolder of your course root folder, see the diagram in section 0.2 above). Wait until the cloning is completed. You can now open the folder in VS Code (and answer Yes about trusting the authors).
6.1.3 Using git command line
Open a terminal (macOS) or PowerShell (Windows). Use cd to navigate to your course root folder (see section 0.2 above). Then run:
git clone https://github.com/ML-MIC/MLMIINThis will create a subfolder called MLMIIN inside your course root folder, containing the course files. Wait until the cloning is completed. You can now open the folder in VS Code (and answer Yes about trusting the authors).
6.2. The .gitignore file and excluded folders
Your clone of the course repository includes a .gitignore file that excludes certain folders and files from being tracked by git. This is important to avoid committing large files (such as large datasets) or any files that are not relevant to the course.
In particular, the .gitignore file excludes:
- A subfolder called
datathat we will use to store datasets. - A subfolder called
excludethat you can use to store any files you do not want git to track. For example, you can use a text file in that folder to store sensitive information such as API keys, passwords, etc. that you do not want to commit to your repository.
The files in these folders are still available to your notebooks when you run the Docker container, but they will not be committed to your git repository. This helps keep your repository clean and avoids unnecessary large files.
Of course any file in your course root folder but outside your cloned repository folder MLMIIN will also be ignored by git.
Go ahead and create these folders now inside your cloned repository folder (MLMIIN). Open a terminal (macOS) or PowerShell (Windows), navigate to your cloned repository folder, and run these commands in order:
mkdir data exclude

cd exclude
Next for MacOS run:
touch emptyfile.txtwhile for Windows run:
New-Item emptyfile.txtFinally (in either OS) run
cd ..
git status
and verify that those folders and the emptyfile.txt do not appear in the list of untracked files. If you have followed these instructions up to this point, git should answer
On branch main
Your branch is up to date with 'origin/main'.

nothing to commit, working tree clean
7. Connect from VS Code to the Jupyter Kernel in Docker
7.1 Run the container
Always run the container from the MIIN repository folder
Make sure you run the following command from the MLMIIN repository folder
7.1.1. In Terminal for MacOS
Run the following command to start the container and the Jupyter kernel inside it.
docker run -it --rm -p 8888:8888 -v "$PWD":/wd mlmiin/mlmiin:2026V017.1.2. In PowerShell for Windows
Run the following command to start the container and the Jupyter kernel inside it.
docker run -it --rm -p 8888:8888 -v "$($PWD.Path):/wd" mlmiin/mlmiin:2026V017.1.3. Check that Jupyter is running
In both MacOS and Windows, after running the command above, you should see Jupyter starting and eventually a line containing:
http://127.0.0.1:8888/labThe container and Jupyter are now running, and you should leave this terminal as it is while you work.
In our course image, Jupyter is configured without a token (password), so the URL we need is simply
http://localhost:8888
Keep terminal open
Keep this terminal open while you work. If you close it, the container (and Jupyter) will stop and you may lose unsaved work.
7.2. Open the course folder in VS Code
Do the following:
- Start VS Code.
- Go to File → Open Folder…
- Select the MLMIIN subfolder of your course root folder.
- VS Code might ask if you trust the folder → click Yes, I trust the authors.
7.3. Open a notebook
In the VS Code Explorer panel (the first icon on the left side bar) navigate to 01_Setup and you will see the 1_1_Introduction.ipynb notebook file there. Do not open it!
Never edit the files in MIIN repository folder!
Before doing anything else, make sure you make a copy of the notebook to avoid modifying the original file. You can do this by right-clicking on the file in the Explorer panel and selecting Copy, then right-clicking again on the exclude folder you created before and selecting Paste.
After working in your copy, you can always delete it or (if you want to keep it) move it outside the MLMIIN folder to avoid git tracking it. This way you avoid merge conflicts when pulling updates from the course repository. Only the instructors will modify the original files in the MLMIIN folder. In case of conflicts, backup your changes somewhere outside the MLMIIN folder and contact your instructor for help.
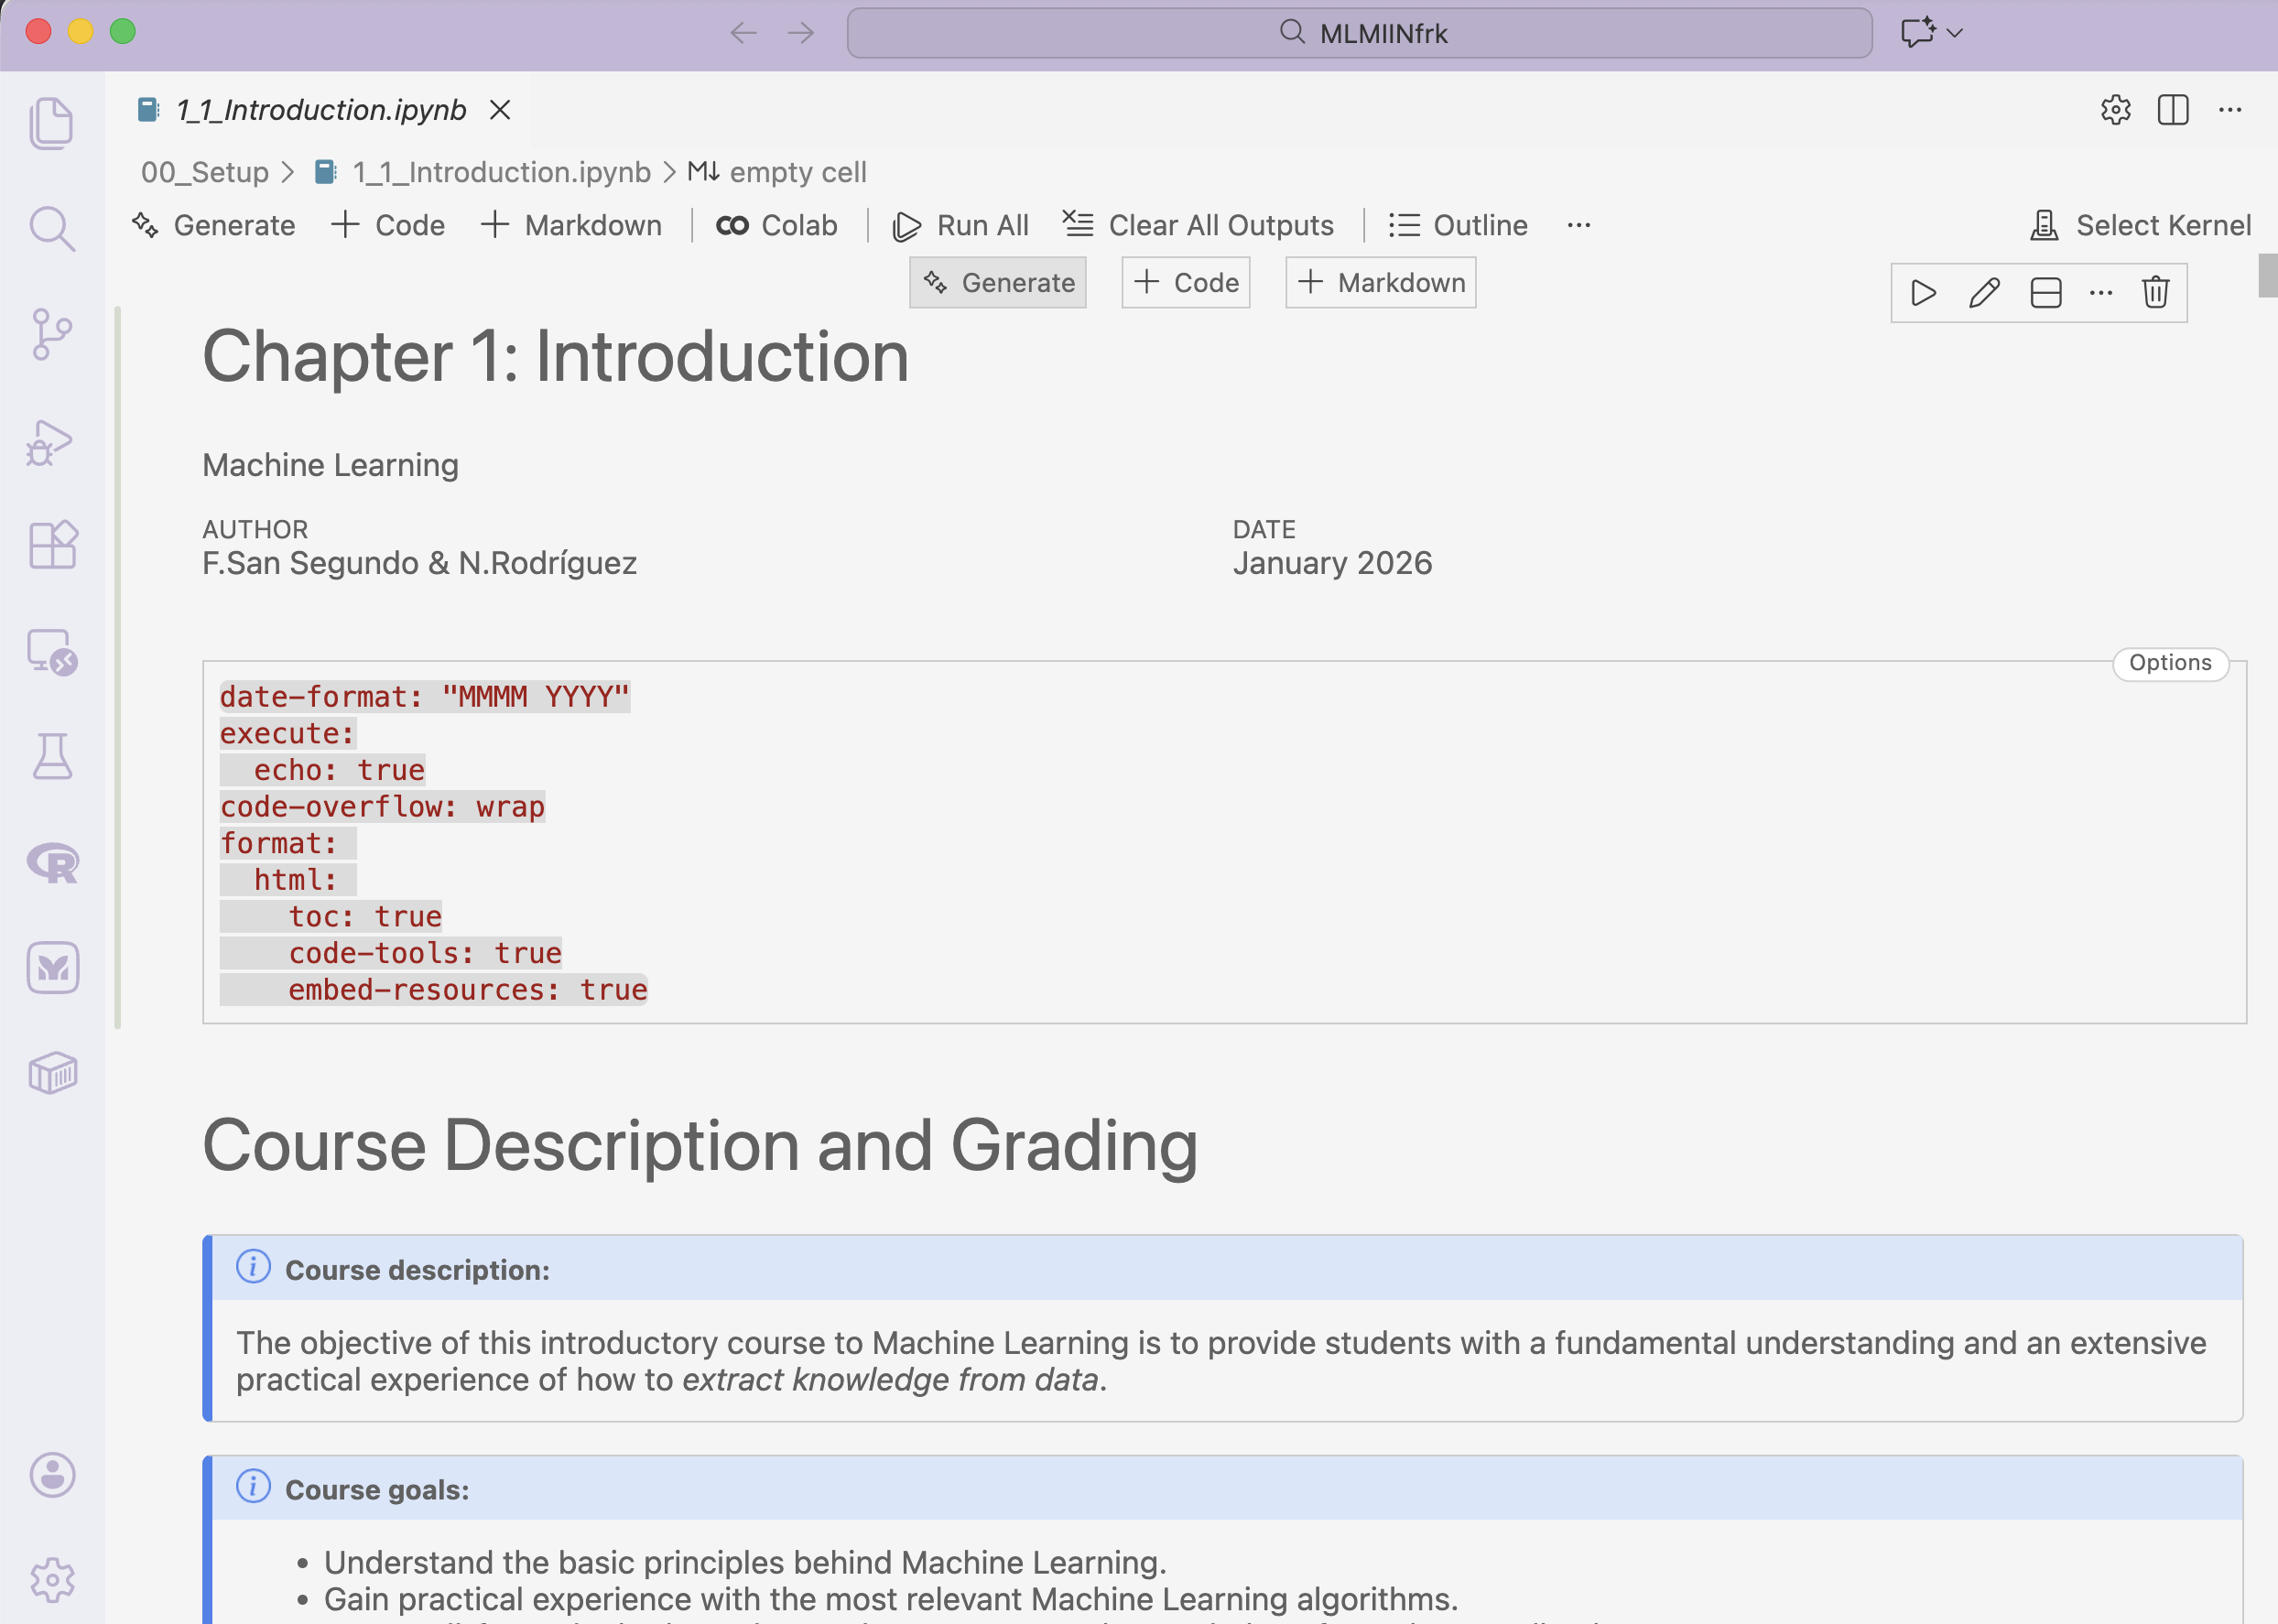
Now you can open the copied file 1_1_Introduction.ipynb from the exclude folder. The file may look different in your computer, because of the extensions, color scheme, etc., but it should be similar to this:
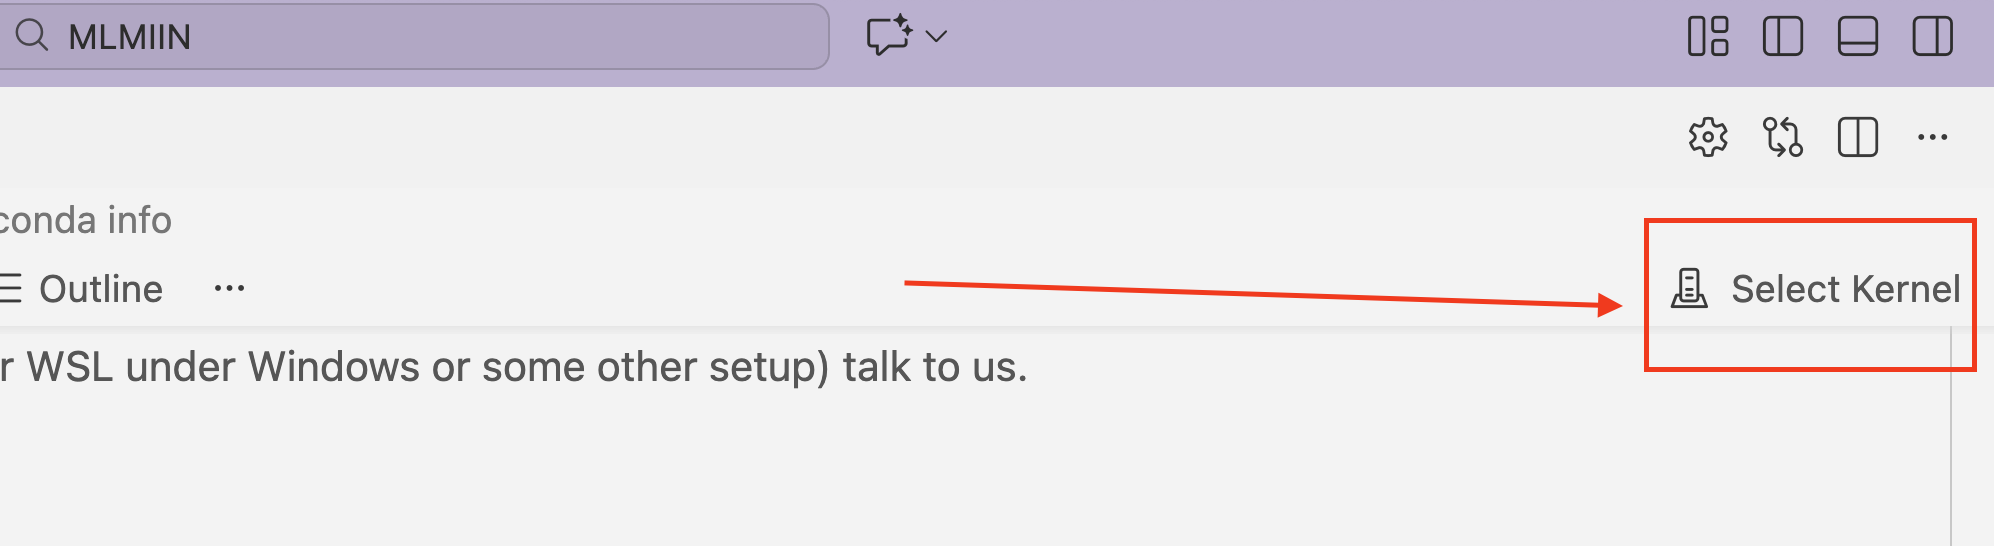
7.4. Select the Jupyter server
At the top-right corner of the notebook editor panel, you should see a Select Kernel button:
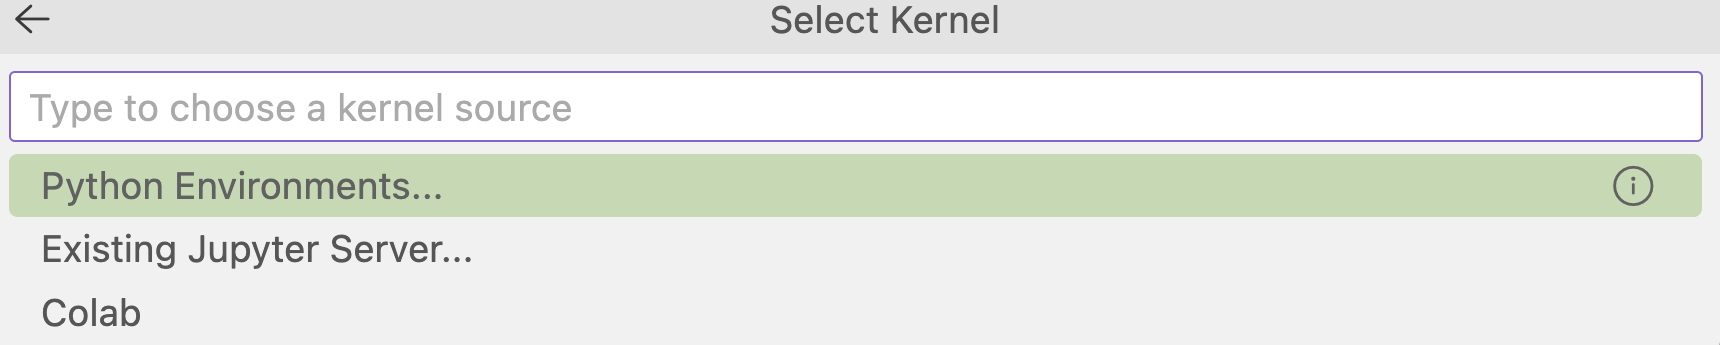
Click on it, and then click on Existing Jupyter server:
In the text field that appears copy/paste this URL
http://localhost:8888and press Enter:
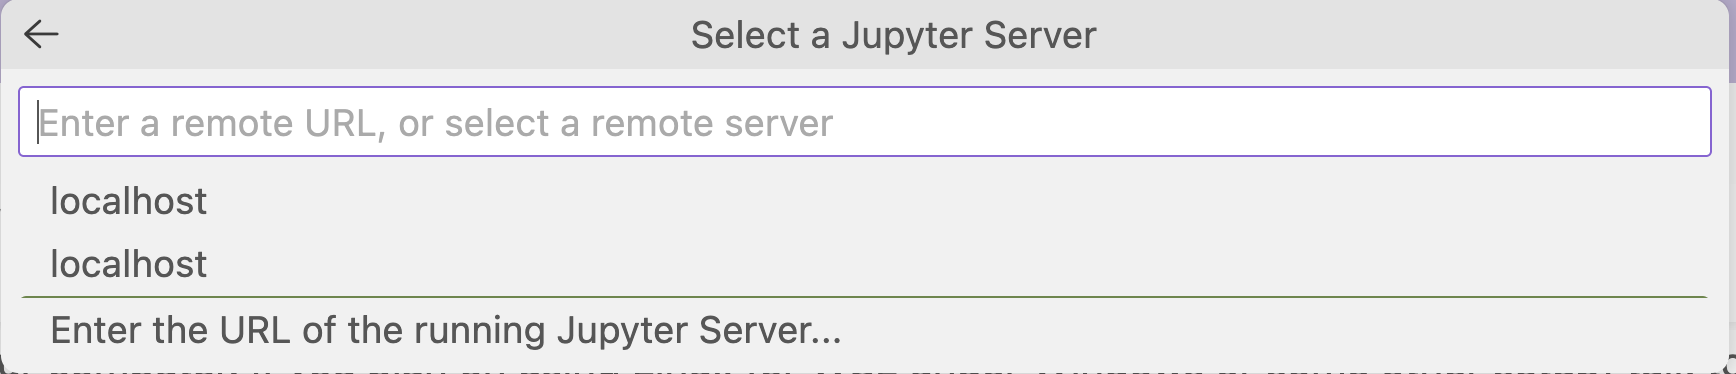
Click on Yes to connect to the server. It is safe to ignore the warning about untrusted server, as we are the ones running it locally. In the next dialog, accept localhost as the name of the server by clicking Enter.
Finally click on the Python 3 (ipykernel) option to select the kernel.

Now you are ready to start executing Python cells in the notebook. Search for the section with title Python Setup Checks in the notebook and run the cells there to verify that everything is working correctly. Let your instructor know if you encounter any issues. In the first course session we will go over these steps together.
7.5 Stopping the Jupyter server and Docker container
When you are done working for the day, and after making sure you have saved your work, go to the terminal where the Docker container is running and press Ctrl + C to stop the Jupyter server and the container. When asked to shut down the server, type y and press Enter. You should see something like this:
^C[I 2026-01-02 18:56:56.756 ServerApp] interrupted
[I 2026-01-02 18:56:56.757 ServerApp] Serving notebooks from local directory: /wd
    1 active kernel
    Jupyter Server 2.17.0 is running at:
    http://5c3619ce62c9:8888/lab
        http://127.0.0.1:8888/lab
Shut down this Jupyter server (y/[n])? y
[C 2026-01-02 18:56:59.126 ServerApp] Shutdown confirmed
[I 2026-01-02 18:56:59.128 ServerApp] Shutting down 5 extensions
[I 2026-01-02 18:56:59.128 ServerApp] Shutting down 1 kernel
[I 2026-01-02 18:56:59.129 ServerApp] Kernel shutdown: 8c717ef9-be70-44b2-b699-79bdad607a07
Always save your work before stopping the container
Remember:
- Save your work
- Stop the Jupyter server and Docker container as described above.
This is something you will need to do at the end of each course session.
8. Typical Workflow for Each Session
For every course session, you will usually repeat these steps. Your instructors will remind you to do so at the start of the first few sessions, but eventually it will be your responsibility to remember to do this.
8.1 Update course files
Always update your clone of MIIN before starting the session
Make a git pull from the origin repository to get the latest course files. Instructions follow.
In your case the origin repository is the original course repository at
https://github.com/ML-MIC/MLMIIN.git
When we update the course files (e.g. new notebooks, fixes, etc.) we will push them to that repository, and you will need to pull them into your fork before starting the session. The way to do that depends on how you plan to manage git.
Warning
If you have made changes in files that have also been modified in the original course repository, you may see conflicts. In that case, contact your instructor for help. Also see below some tips to deal with conflicts.
First rule: always make your own copy of the course notebooks! And for your own experiments remember to use the exclude folder or any other folder outside the
MLMIINfolder to avoid modifying original files.Second rule: the
excludefolder also provides an easy way to backup files and avoid having them overwritten when you pull updates from the course repository. Just move any file you want to keep into theexcludefolder before pulling updates, and move it back afterwards (possibly renaming) if needed.Third rule: when you create your own copies of the files (recommended), and then you run
git statusor use GitHub Desktop or VS Code git integration, you will see that those copies are untracked files. You should ignore them: do not add/commit/push them to your repository. Only the instructors will modify the original files in theMLMIINfolder.
8.1.1. Using GitHub Desktop
If you are using GitHub Desktop
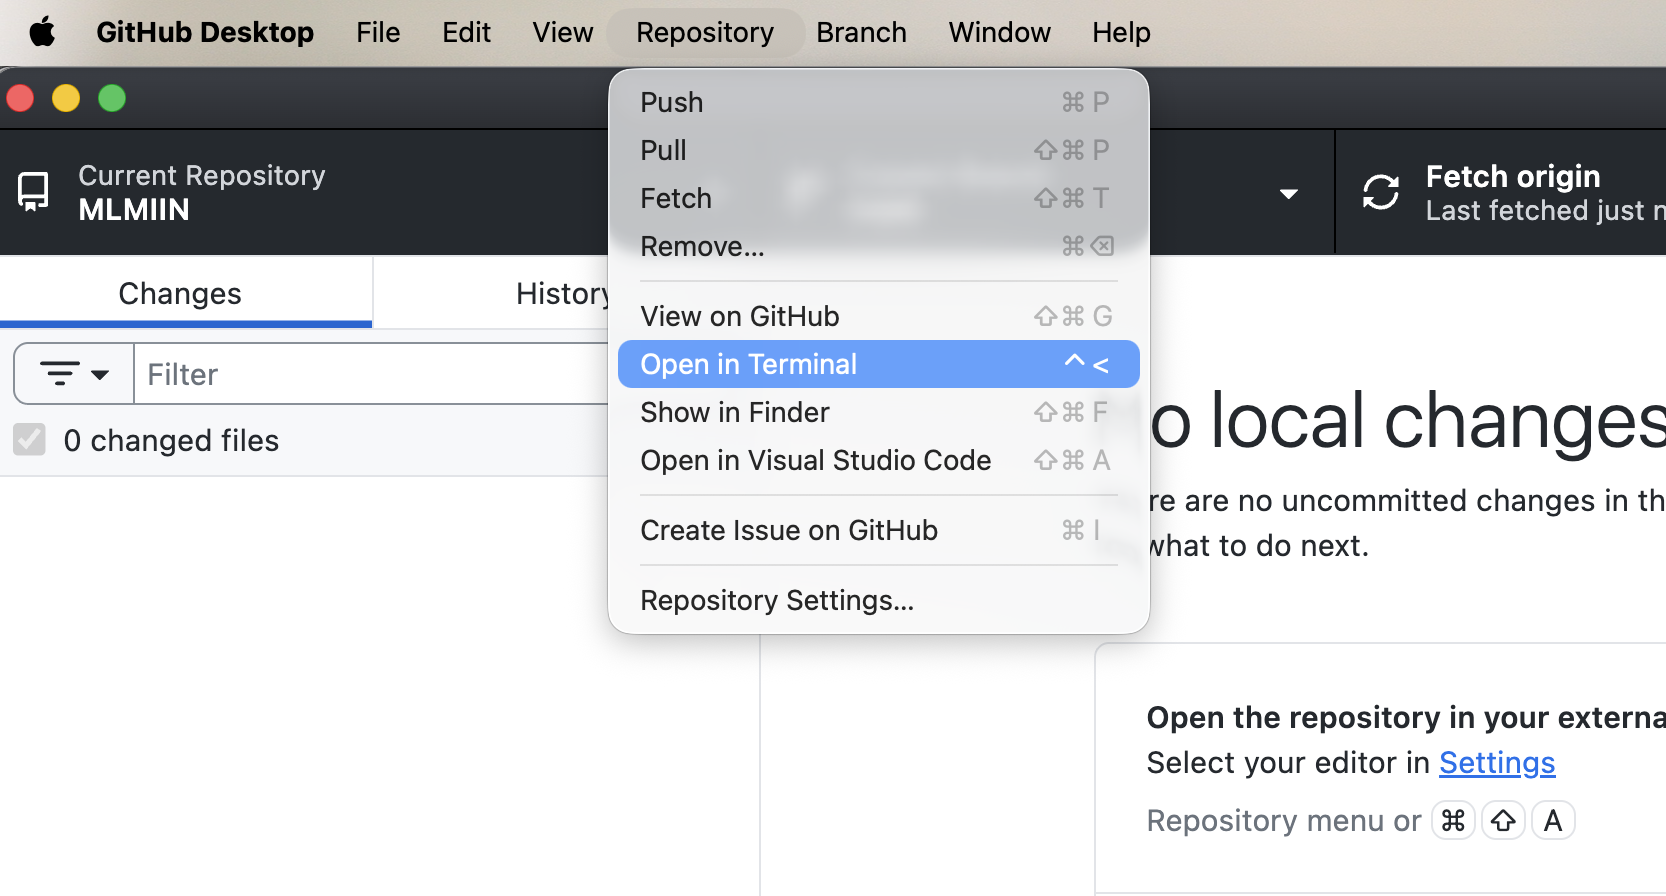
In GitHub Desktop, make sure that your clone is selected as Current Repository.

Then click on Repository → Open in Terminal (in Windows it should be Powershell; see 3.4.2) and wait for the terminal window to open.
When it does, type
git pull origin mainand press Enter. Wait for the operation to complete.
8.1.2. Using VS Code
Click on Terminal → New Terminal to open a terminal window in VS Code.

When the terminal opens in the bottom panel, make sure that you are located in the MLMIIN folder (it should appear in the prompt). Then type
git pull origin mainand press Enter. Wait for the operation to complete.
8.3 Use the Jupyter server running with Docker
Start Docker Desktop (Windows/macOS) → wait until it’s running.
Open a terminal (macOS) or PowerShell (Windows).
Go to the MIIN clone of the course repository inside your course root folder, e.g.:
macOS:
cd ~/ML/MIINWindows (PowerShell):
cd C:\Users\<yourname>\ML\MIIN
Start the container:
macOS:
docker run -it --rm -p 8888:8888 -v "$PWD":/wd mlmiin/mlmiin:2026V01Windows (PowerShell):
docker run -it --rm -p 8888:8888 -v "$($PWD.Path):/wd" mlmiin/mlmiin:2026V01If the container needs to change your instructors will let you know and provide updated instructions.
Open VS Code and connect to the Jupyter server as described in section 7 above.
Open the MIIN folder in VS Code if not already opened.
If needed, make a copy of the notebook you will work on. Do not edit the original file in the
MLMIINfolder!Start working in your copy of the notebook files.
At the end of the session, remember to:
- save your work and
- stop the Jupyter server and Docker container as described in section 7.5 above.